How to Build and Maintain a Loyal Customer Base as a VoIP Reseller If you're a VoIP reseller, building and maintaining a loyal customer base is crucial to the success of your business. Not only does it help you generate a steady stream of revenue, but it also enhances...
Simple SMS API in PHP
SIMPLE SMS API IN PHP
SMS API to forward SMS to an email address
DIDForSale SMS API lets you handle incoming SMS in your application. You can configure the SMS to forward to your URL. Once you set the SMS to your web URL, all the incoming messages will be forwarded to your web URL. From there your application can do further routing or take actions depending on your further requirements and configurations.
How to configure the SMS to forward to web URL?
- Login your DIDForSale customer portal.
- Click on Manage Products
- SMS.
- Select the DID number you want to forward to your web URL.
Please note the DID number you choose should have SMS Enabled on it. - Choose DID action to “Update SMS Forwarding”
- Click on Apply
Below are the screenshots from DIDForSale customer portal to manage SMS Service.
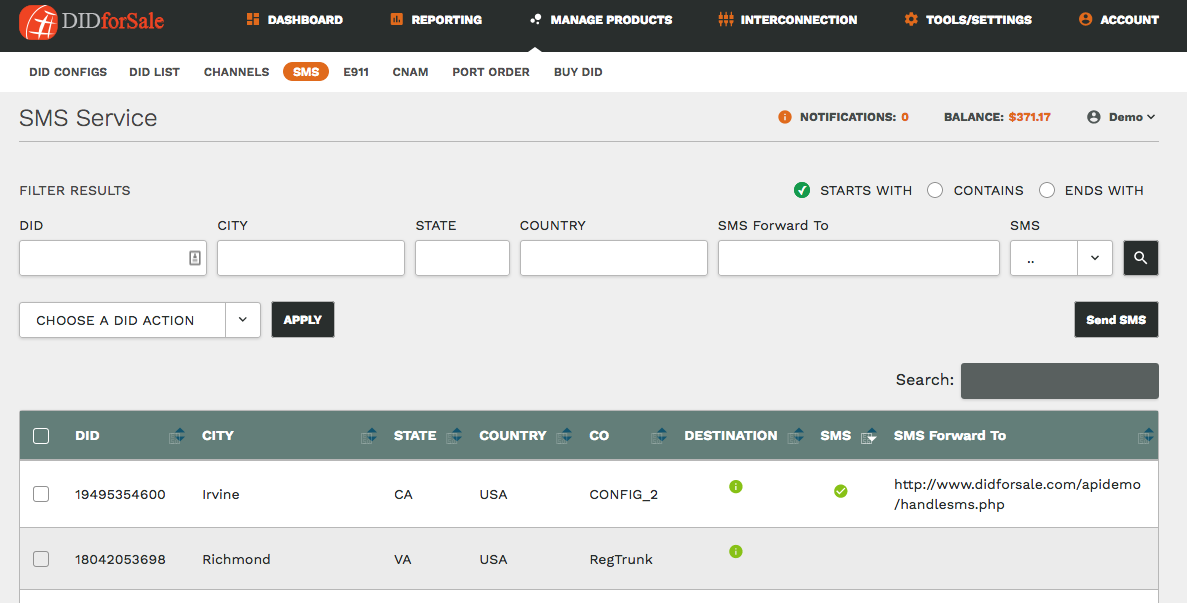
Figure1. Manage SMS service on a phone number.
Once you Choose the DID number that you want to update SMS forwarding on and click Apply you will then be taken to Manage SMS Forwarding. Please See Figure 2. Manage SMS Forwarding.
On this screen you will update the URL. You can choose from one of the three available options.
- Forward SMS to phone number
- Forward SMS to email
- Select HTTP URL for SMS Forwarding to your API.
- Select the 3rd option Select HTTP URL for SMS Forwarding to your API.
Here you will type in the SMS API URL where you want to forward the SMS.
Screenshot of Manage SMS Forwarding screen from customer portal
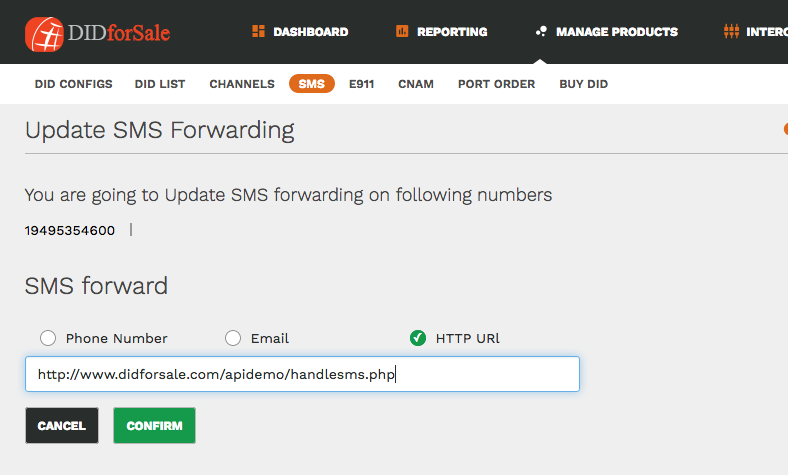
Figure 2. Manage SMS Forwarding
All the future incoming SMS will be forwarded to this new SMS API URL you just configured. You might be using incoming SMS for update/order from customer or may be using SMS for Authentication purpose.
SMS API example!
Here in this simple SMS API example, we will forward the SMS to email address.
When we send the request to your SMS API URL we send following parameters in JSON FORMAT:-
- “From”,
- “To”
- “Text”
Syntax:
{“text”:”This is a text message to sms api”,”from”:”19499300360″,”to”:[“19495354600”]}
Here is PHP Code snippet.
|
1 2 3 4 5 6 7 8 9 10 |
<?php $response = json_decode(file_get_contents('php://input'), r); $subject="You Received a SMS"; $Message="Here is your message\n"; $Message.="From =". $response['from']."\n"; $Message.="To =". $response['to'][0]."\n"; $Message.="Message =". $response['text']."\n"; echo $Message ; mail("email@example","$subject",$Message) ?> |
This is just a simple example to demonstrate how the system works. Based on your needs you can build a system that meets your unique and comprehensive requirements. You can do anything you want with it. You can easily build a complicated SMS or Voice Application using our Developer Kit
New Posts
How to Build and Maintain a Loyal Customer Base as a VoIP Reseller
read more
Maximizing Call Efficiency: Enhancing Call Routing with Call Flow Management Strategies, SIP Trunking and VoIP
Maximizing Call Efficiency: Enhancing Call Routing with Call Flow Management Strategies, SIP Trunking and VoIP In today's fast-paced business environment, maximizing call efficiency is critical to ensuring that customers receive prompt and personalized service. One...
SIP Trunking Implementation: Common Challenges and How to Overcome Them
SIP Trunking Implementation: Common Challenges and How to Overcome ThemSIP trunking is revolutionizing the way businesses connect their phone systems to the internet, providing unparalleled flexibility and cost savings. However, the implementation of SIP trunking can...
Differentiation Strategies for VoIP Resellers: Finding Your Niche in the Market
Differentiation Strategies for VoIP Resellers: Finding Your Niche in the Market As the VoIP market continues to grow, so does the competition among resellers. In order to succeed as a VoIP reseller, it's important to differentiate yourself from other players in the...
The Future of VoIP Reselling: Trends and Opportunities
The Future of VoIP Reselling: Trends and OpportunitiesVoIP is a communication technology that allows voice communication over the internet instead of traditional phone lines. In recent years, VoIP has become increasingly popular due to its cost-effectiveness,...
The Ultimate Guide to Becoming a VoIP Reseller: Everything You Need to Know to Get Started
The Ultimate Guide to Becoming a VoIP Reseller: Everything You Need to Know to Get Started Becoming a VoIP reseller can be an excellent opportunity to start your own business and provide valuable services to your customers. As a VoIP reseller, you will have the...
The Top 5 Features of DIDforSale SIP Trunking That Will Enhance Your Business Communication
The Top 5 Features of DIDforSale SIP Trunking That Will Enhance Your Business CommunicationIf you are looking for a communication solution that can help enhance your business communication, then DIDforSale SIP Trunking is the answer. DIDforSale offers a range of...
Learn more about our Products


Visit SIP Trunking Pricing to see which plan suits your business!
With so many options to pick from it can often be hard to decide what’s best.
Our plans have been packaged together to give you optimum output.
Our plans have been packaged together to give you optimum output.