Mar 9, 2019 | All About VoIP, HowTo, SMS
SMS VIA EMAIL – RECEIVING, REPLYING & SENDING
DIDForSale’s new feature will enable its user to receive, reply & send SMS via email. This will give individuals and resellers the capability to allow anyone to receive, reply & send SMS by using an email address.
- Easy setup.
- As simple as sending or receiving an email.
- Having an account with us is not mandatory for your clients to receive the SMS. Once you associate their email address and assign a SMS DID, they are ready to use the service right away.
Activating SMS
- Login to your DIDforSale account.
- Go to section Product ⇒ SMS. Select the DID and from drop-down select option Activate SMS & hit apply.
SMS Forwarding/Incoming Setup
- Go to section Product ⇒ SMS. Select the DID and from drop-down select option Update SMS Forwarding and hit apply.
- On next page, select option Email and enter the email address you wish to use for receiving, replying & sending SMS.
- Click Confirm.
Incoming SMS
All your incoming SMS will be forwarded to the email associated with you DID. You can also check SMS record in section Reporting ⇒ SMS.
Replying to SMS
To reply to any incoming SMS from your email you need to click the Reply option from email and it will automatically set the recipient address. Type the message you wish to send and click send
Note: Please avoid using signature from email account as it may corrupt the SMS.
Sending SMS
For sending SMS you need to compose an email with following parameters.
Format:
Example:
In above example, we are sending SMS to number 1-949-471-0101 using DID 1-949-930-0360 from the email account associated with number 949-930-0360.
-
Always use 11 digits number format. 1xxxxxxxxxx.
-
Do not use this feature for bulk SMSing or promotional purposes.
-
Always make sure the recipient address & email subject are in correct format before sending the email.
Learn more about our Products
Feb 21, 2018 | All About VoIP, HowTo, Uncategorized
Send & Receive Fax via Email
DIDForSale is happy to introduce a new feature which will enable its user to send/receive Fax via email. This will help individuals and give resellers the capability to allow anyone to send/receive fax via using just an email address.
Benefits:-
- Easy setup.
- As simple as sending or receiving an email.
- Having an account with us is not mandatory for your clients. Once you authorize their email address and assign a Fax DID, they are ready to use the service right away.
Sending Fax
- Login to your DIDforSale account.
- Go to section Product ⇒ Fax Emails & click on Add New Fax Email.
- On Create New Fax Email page enter the email address (which needs to be activated for sending the fax) and enter the DID (which will be used as Fax number).
- Click Add to save the changes.
Now go to the email account dashboard and compose a new email in the format below. Attach your document in PDF (.pdf) or Microsoft Word Document (.docx) format.
Format: fromfaxnumber-tonumber@fax.didforsale.com
Example: 19494710101-19492690449@fax.didforsale.com
In above example, we are sending the fax from DID 1-949-471-0101 to another fax number 1-949-269-0449 from the email account activated for eFax.
Receiving Fax
- Go to section Product ⇒ DID Configs & click on Fax DID to manage routing page.
- On Manage Routing page, select eFax from SELECT YOUR CONFIGURATION dropdown.
- On the second dropdown choose option Select Email & enter your email.
- Click Save to apply changes.
Learn more about our Products
May 26, 2017 | HowTo, Voice API
Time based Call Forwarding
With our CPAAS, you can create dynamic time based call forwarding. Whenever a customer call your number, our system will call webhook url defined for that number and you can dynamically send the number you want to forward the call to. Below is a small sample php script, you can setup call forwarding in minutes without even having a phone system.
Benefits of Scheduled call forwarding:
Forward business calls to any number, any device and, at any location, anytime.
- Automatically forward phone calls to any phone number, such as your call center on east coast, call center in Asia or South America, based on the time of the day to ensure your calls always get answered.
- Forward calls to any extension, phone number, group, or department simultaneously or sequentially.
- You can specify the number of times each phone rings before calls forward to the next telephone number.
- It’s easy to forward calls based on caller ID information, the time of day, date range, and more; ensuring important callers are prioritized and quickly routed to the right person or department.
Here is a sample php script to transfer call to 3 different location based on time.
Save this in your website as say “http://www.businessphoneservice.us/phone/callforwarding.php”
1 2 3 4 5 6 7 8 9 10 11 12 13 14 15 16 17 18 |
<?php header("content-type: text/xml"); //Assuming PST Time zone if (time() >= strtotime("00:00:00") and time() <= strtotime("08:00:00") ) { $PHONENUMBERTODIAL = "19499300360" ; // Send call to Asia Call Center } elseif (time() >= strtotime("08:00:00") and time() <= strtotime("16:00:00") ) { $PHONENUMBERTODIAL = "18005797676" ; //Send call to east coast call center } else { $PHONENUMBERTODIAL = "18008393817" ; //Send calls to West coast center } echo "<?xml version=\"1.0\" encoding=\"UTF-8\"?>\n"; ?> <Response> <dial> <Say> Please hold while we connect your call </Say> <number><?php echo $PHONENUMBERTODIAL ?></number> </dial> </Response> |
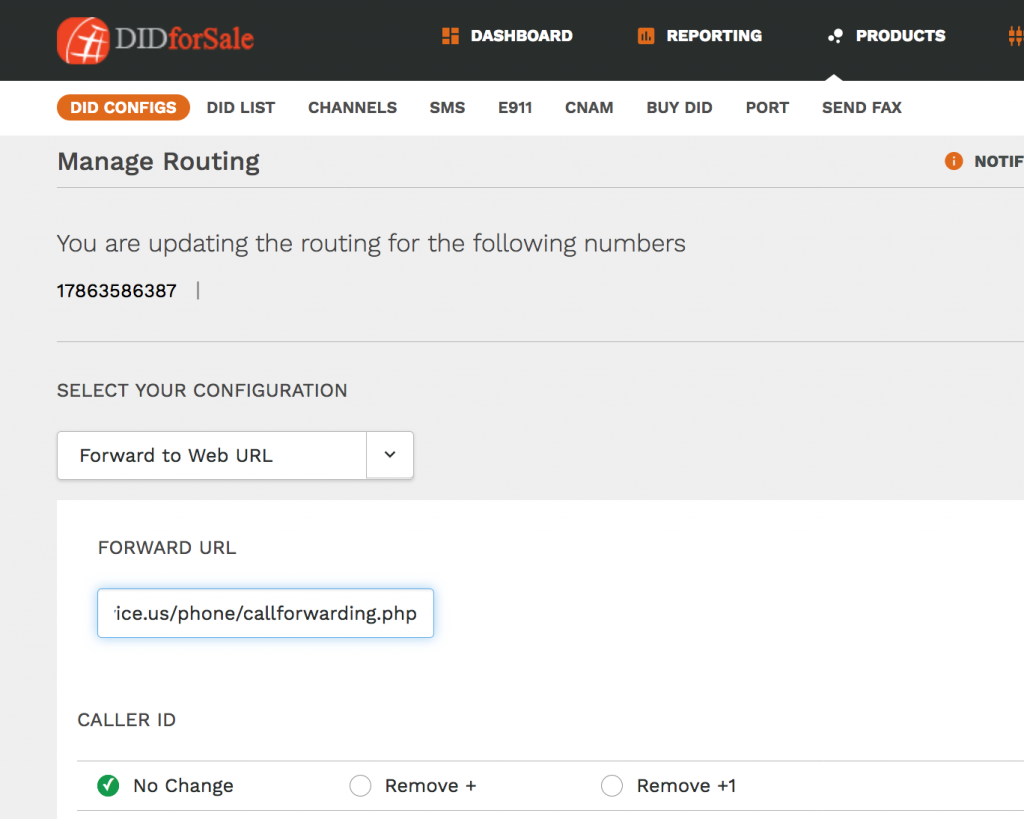
Now all you need to do is update the DID routing to this web hook URL,
How to configure the Phone to webhook URL?
- Login your DIDForSale customer portal.
- Click on Manage Products
- Select the DID number you want to forward to your web URL.
- Choose DID action to “Update SMS Forwarding”
- Click on Save. Next time when a customer call the number, phone system will call the best url get the dial plan in xml format and connect the caller to the number.
Dynamically Call forwarding to another number.
Learn more about our Products
Oct 12, 2016 | HowTo, Voice API
DIDForSale Voice API, lets you create a Click on Call Application in your website. With the Sample code and DIDForSale API, you can create a simple Click to Call form, ask the user to enter a phone number and click on call me now button. Code will call DIDForSale Voice API and will dial the customers number. Once the customer pick up the call, he will be connected to the agent.
Why should I have Click to Call Button?
- Your customer is visiting your website and they want to talk to someone right now, in placing of calling your business line, going through IVR and wait in queue, she chooses your agent to call her.
- This is another way to connect the customer to the right person. Great way to increase the sales.
- Customer can not to dial out long distance number.
How Click to Call Works:
- In this example, user will see the form. Type in their phone number with country code and click on call me now button.
- PHP code will take the number, call the DIDForSale API to complete the call.
- Code will call the API and post the following information in JSON format.
- ‘from’ => $CALLERID, ‘to’ => $to, ‘apikey’ => $APIKEY.
- DIDForSale voice application will call the “TO” Number first.
- Once the person pick up the call, then call will be connected to the caller ID number immediately. This caller id number can be main business number or direct line to an agent or even a call queue in the call center.
What Do you need to use Click to Call Feature to Work with DIDForSale Voice API:
- You need an account with DIDForSale Signup for Free Account.
- By default your account is allowed to call all over USA and Canada. If you need to call international locations, contact your account rep.
- And API Key, so that our system can authenticate your application to complete the call on your behalf.
Can I get a new local phone to be used for Click to Call:
Yes, you purchase new number from anywhere in USA, UK and Canada. That number can be connected to your PBX with SIP Trunking service.
Once you have a working account, you can build your own application to connect with your customers. Here is sample PHP code to build your own Click to Call Application.
1 2 3 4 5 6 7 8 9 10 11 12 13 14 15 16 17 18 19 20 21 22 23 24 25 26 27 28 29 30 31 32 33 34 35 36 37 38 |
<?php session_name("CALL"); session_start(); $APIKEY="YOUR_API_KEY"; $CALLERID="19499300360"; if(isset($_POST['callme'])){ if (!isset($_SESSION["date_mail"]) || (time()-$_SESSION["date_mail"]) > 20) // Put a limit how many SMS some one can received. For now set to 120 seconds. { $_SESSION["date_mail"]=time(); } else { sleep(3); echo gettext("Sorry This number has been called Recently. Please wait 2 minutes before you try again!"); exit(); } $BASEURL="https://api.didforsale.com/didforsaleapi/index.php/api/V2/CallTermination"; $to = $_POST[phonenumber]; $data = json_encode(array('from' => $CALLERID, 'to' => $to, 'apikey' => $APIKEY)); } $ch = curl_init($BASEURL); curl_setopt($ch, CURLOPT_RETURNTRANSFER, TRUE); curl_setopt($ch, CURLOPT_POST, TRUE); curl_setopt($ch, CURLOPT_HEADER, FALSE); curl_setopt($ch, CURLOPT_POSTFIELDS, $data); curl_setopt($ch, CURLOPT_HTTPHEADER, array("Content-Type: application/json")); curl_exec($ch); curl_close($ch); ?> <center> </h1>Simple Click to Call Application</h1> <form name="authform" method="post" action"<?php echo $_SERVER['PHP_SELF']?>" > <table id="phone"> <tr><td>Phonenumber:</td><td><input type="text" name="phonenumber" maxlength="11" id="phonenumber" /></td></tr> </table> <input type="Submit" name="callme" value="Call Me" /> </form> </center> |
Want to build more complicated Voice Application? Check out Developer Kit. There you can find more documentation to build Voice or SMS applications.
Oct 6, 2016 | HowTo, SMS
SMS API can be used to create one time authentication system. SMS authentication allows you to dynamically generate codes for secured login.
Why do you need to have SMS authentication system?
To answer this question let me ask you do you require your clients to create an account with secured log in?
If your answer is Yes, then yes SMS API is right choice for you. Lets see how:-
For example a new customer wants to signup for your service. But you want to make sure that this new signup is real person with real phone number. You can create a multi-factor authentication to verify the user identity before you provide access to critical information. Your application will ask for the phone number, send a random text message and authenticate the new signup based on the code you send to her phone number.
This is one of the most secure way to let people sign for new service or let people login to access very sensitive information. Most banks, Whatsapp, Facebook, Google and Yahoo send SMS to verify the identity and the person who is signing up.
How SMS Authentication works:
SMS API will follow following steps to generate and authenticate a user login process.
- New customer wants to sign up or login to a protected information.
- Application asks for valid cell phone number.
- Your application generates a random code.
- Call DIDForSale SMS API to send SMS to the customer.
- Ask customer to verify the secret code.
- If the code matches, your application allows the customer to login.
What Do you need to use SMS Authentication:
- You need an account with DIDForSale Signup for Free Account.
- Need to purchase a Phone number, so you can use that number to send SMS.
- SMS service should be enabled on the phone number to send and receive SMS.
- And API Key, so that our system can authenticate your application to send SMS on your behalf.
Once you have all the information, you can build a SMS authentication system. You call the REST API and send “From”, “TO” and “SMS Text” in JSON (JavaScript Object Notation) format. You can build the authentication system in any language of your choice.
Here is sample code to build SMS Authentication system with PHP.
1 2 3 4 5 6 7 8 9 10 11 12 13 14 15 16 17 18 19 20 21 22 23 24 25 26 27 28 29 30 31 32 33 34 35 36 37 38 39 40 41 42 |
<?php session_name("SENDSMS"); session_start(); $APIKEY="YOURAPIKEY"; $TOKEN="APITOKEN" ; $CALLERID="VALIDPHONENUMBER"; $PINCODE=rand(18760, 99736); if(isset($_POST['sendsms'])){ if (!isset($_SESSION["date_mail"]) || (time()-$_SESSION["date_mail"]) > 120) // Put a limit how many SMS some one can received. For now set to 120 seconds. { $_SESSION["date_mail"]=time(); } else { sleep(3); echo gettext("Sorry the confirmation SMS has been sent already. Please wait 2 minutes before you try again!"); exit(); } $BASEURL="https://api.didforsale.com/didforsaleapi/index.php/api/V4/SMS/SingleSend"; $to = array($_POST[phonenumber]); $data = json_encode(array('text' => $PINCODE, 'from' => $CALLERID, 'to' => $to)); } $ch = curl_init($BASEURL.$APIKEY); curl_setopt($ch, CURLOPT_RETURNTRANSFER, TRUE); curl_setopt($ch, CURLOPT_POST, TRUE); curl_setopt($ch, CURLOPT_HEADER, FALSE); curl_setopt($ch, CURLOPT_POSTFIELDS, $data); curl_setopt($ch, CURLOPT_HTTPHEADER, array("Content-Type: application/json","Authorization: Basic ".base64_encode("$APIKEY:$TOKEN"))); curl_exec($ch); curl_close($ch); ?> <center> </h1>Simple SMS/Call Authentication Form</h1> <form name="authform" method="post" action"<?php echo $_SERVER['PHP_SELF']?>" > <table id="phone"> <tr><td>Phonenumber:</td><td><input type="text" name="phonenumber" maxlength="11" id="phonenumber" /></td></tr> </table> <input type="Submit" name="sendsms" value="SMS" /> </form> </center> |
Check out Developer Kit. There you can find more documentation to build Voice or SMS application.